Category: Activities

a photo of an ice cream cone with strawberry and chocolate chip ice cream with a circular wafer

The Half-Day (Ice Cream) Hike

  |   By


Simple activity – go for a half day hike in your local area and finish with an ice-cream

  • Find a local walk or route that will take about 2 hours, and that you could do with other young people (at appropriate social distancing requirements) or your family.
  • Ensure that it takes in some local landmarks and features, for example on the half day hike at Blair Atholl, we go past Blair Castle, go up to “The Folly” (a building or landmark built for decoration and no other practical purpose) and finish at the Falls of Bruar (a series of spectacular waterfalls)
  • Can you find similar landmarks and natural features in your local area?
  • Finish your hike at a local ice-cream shop and enjoy a well-earned treat

Don’t forget to take the appropriate kit with you – good comfy footwear suitable for the terrain, snacks, water bottle, map & compass, small first aid kit and don’t forget the waterproofs (it is Scotland after all). Also you’ll need money (probably a card/contactless at the moment) to buy your ice-cream!

And tell someone where you are going, details of the route and estimated time of finishing.

If you’re looking for something a little more challenging, you could try the Munro Mountain Hike Challenge.

Share pictures of your walk and your ice cream with us on social media using the hashtag #BlairEverywhere

Contributed by the Hill Team
Make a Washer Bracelet or Necklace

   |   By


I find washers lying around everywhere. Out in my parents shed, in ‘that’ kitchen drawer that has everything, in, my bicycle repair kit and in DIY shops for pennies!

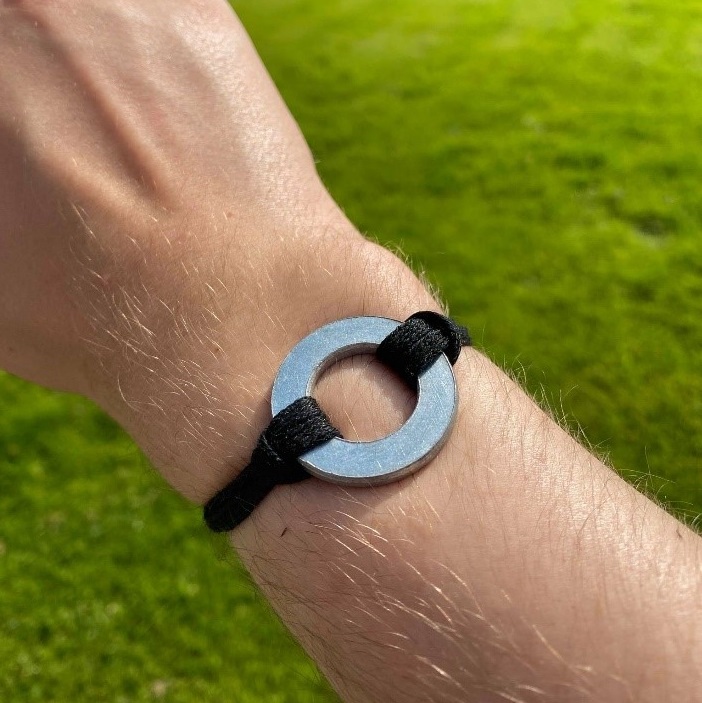
Washers are great for making DIY Jewellery. They’re made of stainless steel so wont rust or turn your skin green, they hold colour extremely well using nail polish, they are easy to texture with hammers and punches – Plus, they look sleek and sophisticated when paired with a simple cord!

Why not try starting simple. Take a plain washer and some cord (Household twine works well but use coloured wool or leather cord from the craft shop if you’re feeling spicy), loop the cord through the washer and tie an adjustable sliding knot to create an open necklace. This will create a very simple design to base your creations from.

From this you can then begin customising your designs. Add different coloured cord to change the look, wrap it round the wrist several times to create an outdoor aesthetic. Use nail polish to add colour to the washers to create statement pendant necklaces or multicoloured bracelets. Add more washers to the design, use cord to link them together to create a chainmail effect. There are many examples online but be creative – try something different, there are no wrong solutions!

Here are some examples of designs, if you don’t find a style that matches your aesthetic – create a new design that does! These are a great idea for gifts and the possibilities are endless. Have fun!

Remember to share your photos with us on social media using the hashtag #BlairEverywhere

Fire on water

   |   By


Please always ask for permission before making fires in your garden or anywhere else! This activity should be done outdoors, and make sure you have a spare bucket of water to hand in case you have to put out a fire quickly.

Materials

  • Basin, bucket…something to hold water in and float a fire on!!!
  • Sticks and string. Could be dry wood of thin branches that you cut.
  • Scissors.
  • Fire starting supplies like tinder and matches. Maybe a home-made firelighter.

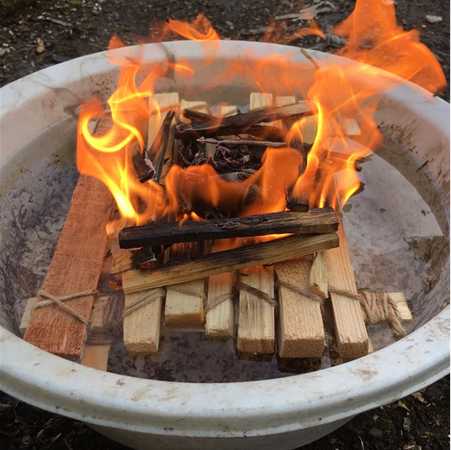
Now we are going to make a raft out of sticks and string. It might be a good time to practice your clove hitches and square lashings! It’s not essential by all means, so if you can’t tie fancy knots, don’t let it spoil your fun.

Obviously the better the raft is tied together, the higher chance it has of staying together.

So, here’s the start.

Next, we’ll built up the body of the raft. Place a row of sticks over the top of your frame and wrap the string around the ends and the cross-piece below.  Keep using your string and sticks until you have a floor over the raft. 

Like this……

Now we need to build up our fire.

Tinder at the bottom, cotton wool with a bit Vaseline is ideal. Anything you know will work. It’s a fun experiment not a University degree course in fire lighting!!!
Build your dry stick in a “hashtag” shape.

Choose your preferred fire lighting method, be it matches, lighter of Swedish fire steel.

(There’s no photos as I got carried away with myself and couldn’t wait to light it. Yes, I’m an adult and fire still excites me!!)

Now if you’ve built you raft well it should hold together. See how long you can keep it going for.

Contributed by the Bushcraft team

Do-it-yourself Bowling

   |   By


Get 10 plastic containers (these can be empty, half empty or full) shorter indoor version is for 6 containers. Make sure lids are screwed on tight.

Find various sizes of balls such as tennis, cricket, rugby, football etc

Place the containers in a triangle (1 in the front row, then 2, then 3, and 4 in the last row)

Idea of the game is to knock down all the containers with only 3 throws of the ball

If you knock the front one down it’s 1 point, any of the 2 in the second row 2 points, 3rd row 3 points and 4th row 4 points.

If you knock them all down within 3 throws then you gain another 5 points.

The main theme of the game is different shaped containers with different shaped and sized balls

This can be played over as many ends (rounds) as you like but I normally stick to around 6 ends a game. It is easier if you are playing with someone that someone plays up and someone plays down

A screenshot of the landing page for one of the quizzes in the Kahoot app

Test your knowledge

   |   By


Are you brave enough to have a go at the longer “Muckle Monster Quiz” or the shorter “Wee Quiz”?

Download the Kahoot App from the App or play store and give the quizzes a go.

Kahoot is free, it’s anonymous, and it’s been used by some Scottish teachers to give quizzes and activities during lockdown.

Use the links below to get the pin number required, and links to download the app on your phone or tablet.

The Muckle Quiz

https://kahoot.it/challenge/08801f97-0ee0-40e1-807b-f00547abbae4_1594558267843

The Wee Quiz

https://kahoot.it/challenge/08801f97-0ee0-40e1-807b-f00547abbae4_1594558408050

If you want to share your scores on social media, make sure to use the hashtag #BlairEverywhere

Contributed by the Cultural Zone

Pompom Eyeballs

   |   By


These pompoms can be made in pairs to add to other craft projects, or you could just make a single fluffy eyeball to enjoy as a decoration at home.

You could make a wreath of pompom eyes to hang on your door at Halloween – although it might take you from now until October to finish it!

You will need:

  • Scrap cardboard
  • A small amount of black wool for the pupil
  • Some green/brown/ blue wool for the iris
  • A ball of white wool for the rest of the eye
  • Sharp scissors

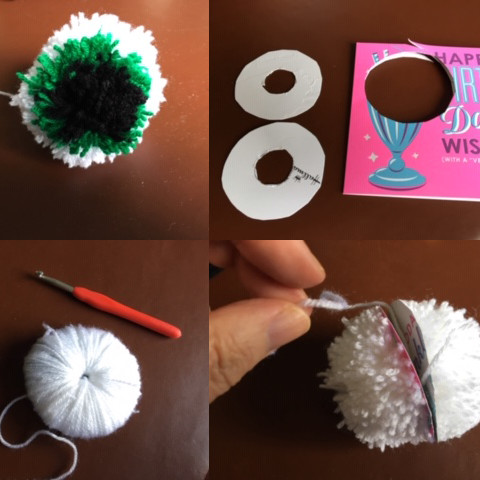
The step by step instructions and pictures are below.

Remember you can share pictures with us online. Post your photo with the hashtag #BlairEverywhere and we’ll reshare some of our favourites


Cut two identical circles out of cardboard as
shown. (About 6-7cm diameter with central circle
no bigger than 2cm)

Placing circles together, wind black wool round the
two discs only covering about 15% of the area
Ensure the black wool is quite thick as this will
make the pupil.

Next, cover the black wool completely with
whatever coloured wool you have chosen. This
time make sure it covers about 25% of the surface.
Again make sure it’s a thick layer.

Now using the white wool, completely cover the
whole surface, including the coloured wool. This
will take a little while – good time to have a chat
while doing it. When the centre circle is amost
filled then stop. I used a crochet hook to help get
the wool through, but you could use a pencil.

Slip the scissors in between the two cardboard
discs and cut round the edge. Don’t take the
cardboard off yet!

Cut a length of wool and tie it tightly round the
middle – between the two cardboard discs. (Use a
longer piece of wool if you want to hang it up, but
make sure you don’t leave the ends coming out of
the coloured part.

Now break the cardboard discs off and trim any
loose strands.

We’d love to see photos and videos of you making your pompom eyes! Come and share them with us on social media using #BlairEverywhere

Contributed by the Craft team

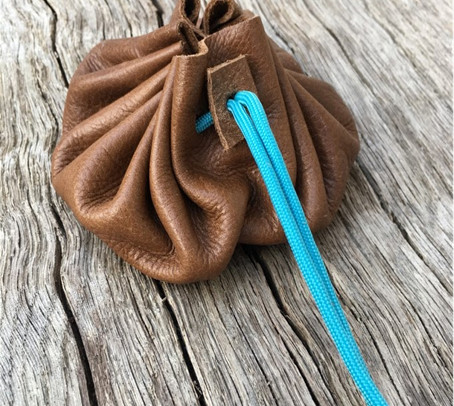
A brown leather pouch with a blue paracord tie holding it closed

Make a leather pouch

   |   By


So, we’re going to make a bush craft pouch which can be used for fire lighting materials or coins or anything you want. If you don’t have all the materials you can improvise and the skills you learn will be easily replicated when you have gathered better materials.

Materials

  • I used leather from an old settee, but you could use canvas from an old tent or any material. Please don’t cut a hole in the family settee!!! Material will tend to fray at the cut edge that’s why leather is better. You can often get nice leather from a furniture store if you ask for some old samples.
  • A piece of paracord, string or twine for closing it.
  • A sharp pair of scissors or a craft knife.
  • Hole punch
  • Pen

We are looking for a piece of leather/material/canvas about 25cm diameter or about the size of a dinner plate. The bigger the piece of material/size of circle then the more you can store in the pouch.

Place on a flat surface and draw around the plate or use a pair of compasses to draw a circle. Watch the point doesn’t puncture the leather.

We need to make holes around the outside edge about 1cm in so it’s better to mark them out first.

We need an even number of holes. 16 will work fine but 32 gives a better finish.
Start drawing a line from top to bottom through the centre like marking out north to south. Then east to west. Keep following the compass points and you’ll have 16 or 32 evenly spaced holes.

We now need to make the holes on the marks. Either a hole punch or a nail or scissors.

We now need a little scrap of leather with 2 holes punched in it.  This will help keep the pouch closed.  You could make a bead from wood or use a plastic bead or whatever you have. 

So, we’re almost there.   Take a length of twine or string, the stronger the better and thread it in and out of the holes.   You want to end up with both tails on the outside of the pouch.

Take the leather tab with the 2 holes in it and fold in half.  Thread both tails through the tab or bead that you have chosen.

Once you pull the cord the pouch will close up.

Congratulations, you should now have a bush craft pouch.   With a little practice and finding the right materials you will get better at making these.   I hope you have fun and enjoy making them.

Share pictures and videos of you making your pouch on social media using the hashtag #BlairEverywhere

Contributed by the Bush Craft team

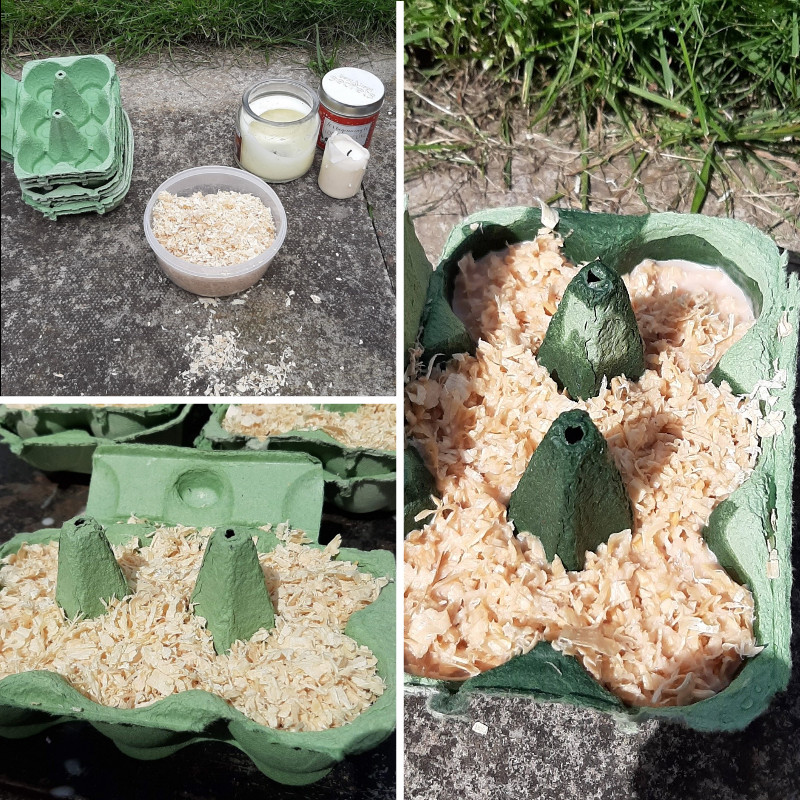
A composite image showing the supplies needed for the egg carton firelighters, and a few steps of the process

Egg Carton Firelighters

   |   By


These firelighters have a number of advantages over the shop bought fire lighters, they don’t have that horrible paraffin smell that gets everywhere, they are cheap, and they last for ages. My explorers have tested them, and one burned for 18 minutes.

You will need:
• a cardboard egg carton
• wood chip/shaving/sawdust (supermarket animal bedding is good)
• candle wax (Old burned out candles are fine or cheap shop-bought candles do just as well)

1 Melt the Wax. SLOWLY
• Be careful, hot wax is like chip fat, it burns very easily and can give you a very nasty burn. Turn off the heat before the wax has fully melted and do not let it boil.
• If the wax starts to pop like chip fat, turn off the heat and wait a few minutes
• Use an old pot or be prepared to do a LOT of clean up
2 Pack sawdust into the egg carton and lightly press it down.
• Fill the cells but do not overfill to the top of the carton.
• It is a good idea to put the carton in a dish in case of leakage.

3 Pour the wax into the cells
• Pour it in until the sawdust is just covered.
• The wax may leak out of the cardboard so please do this on a tray to prevent spillages.
• Top up if necessary
• If the wax is too hot it will leak out through the cardboard.

4 Let it cool completely
• Leave it overnight for the best results

5 Tear off a cell and light the cardboard. It should light instantly and burn for about 10 minutes

6 If you have wax left over, cut the carton lids into strips about 2cm wide and soak in the wax. You can use these for tapers for lighting fires, so much easier to handle than a match.

Now come and share your pictures with us on social media using the hashtag #BlairEverywhere

Contributed by the Bush Craft team

Make your own Balloon Juggling Balls

   |   By


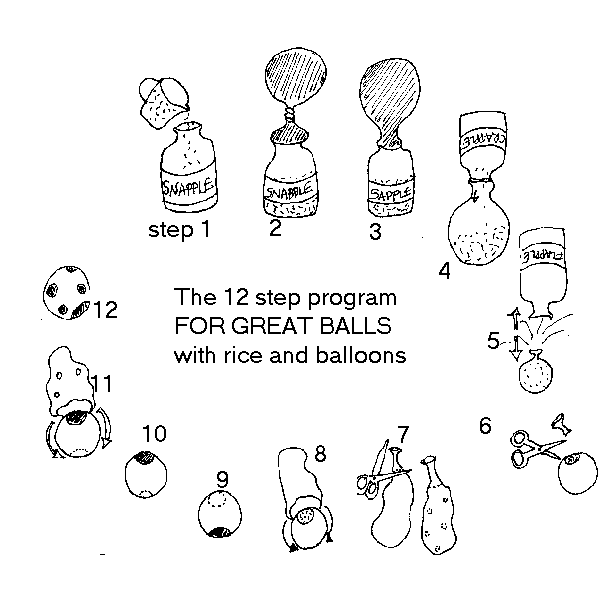
This creates a nice completely smooth ball using 3 balloons (12” size) filled with 3/4 cup (or adjust for the size you like) with short grain rice.

You’ll need:

  • A measuring cup
  • A bottle (I like the Snapple size bottle because of the wider mouth it’s easier to fill with rice)
  • 12” balloons (4 times as many balloons as you want balls)
  • Short grain rice (3/4 cup for each ball you plan to make, plus a little extra cause it’s easy to spill)

Sit outside, or in an area where it’s okay to spill some rice.

  1. Pour the rice from the measuring cup into the bottle.
  2. Inflate the balloon with just a couple of breaths (so it’s bigger than a juggling ball). and twist (don’t tie) the neck of the balloon, and stretch the mouth of the balloon over the opening of the bottle.
  3. Let the balloon neck untwist (You now have a partially inflated balloon on the neck of a bottle of rice.)
  4. Invert the bottle with the balloon and pour the rice into the balloon.
  5. Take the balloon off the bottle, and let it deflate around the rice inside.
  6. Cut off the entire neck of the balloon, leaving a small hole with rice exposed.
  7. Take a 2nd and 3rd balloon and cut off the necks – plus a little bit more, so the hole is bigger than the neck
  8. [Option: cut tiny holes in 3nd balloon…This makes for very colourful balls, you can even cut tiny fancy patterns of holes if you’re patient. This does make the final stretching in step 11 more difficult, but every hole will leave a polka-dots of the underneath colour showing through once it’s stretched over] (illustration step 7)
  9. Stretch the second balloon wide open (it will sometimes break while trying to do this) and, covering the small exposed hole, enclose the rice-balloon with the 2nd balloon. (steps 8 and 9 in illustration)
  10. Turn the ball over
  11. Repeat with a third balloon and stretch over the ball, covering the place where the ball is just one-balloon thick.
  12. Tada, now learn how to juggle and remember it takes a lot of patience!

Share your juggling balls and skills with us on social media using #BlairEverywhere

Contributed by the Circus Skills team