Posts by: Blair Everywhere

Do-it-yourself Bowling

   |   By


Get 10 plastic containers (these can be empty, half empty or full) shorter indoor version is for 6 containers. Make sure lids are screwed on tight.

Find various sizes of balls such as tennis, cricket, rugby, football etc

Place the containers in a triangle (1 in the front row, then 2, then 3, and 4 in the last row)

Idea of the game is to knock down all the containers with only 3 throws of the ball

If you knock the front one down it’s 1 point, any of the 2 in the second row 2 points, 3rd row 3 points and 4th row 4 points.

If you knock them all down within 3 throws then you gain another 5 points.

The main theme of the game is different shaped containers with different shaped and sized balls

This can be played over as many ends (rounds) as you like but I normally stick to around 6 ends a game. It is easier if you are playing with someone that someone plays up and someone plays down

A screenshot of the landing page for one of the quizzes in the Kahoot app

Test your knowledge

   |   By


Are you brave enough to have a go at the longer “Muckle Monster Quiz” or the shorter “Wee Quiz”?

Download the Kahoot App from the App or play store and give the quizzes a go.

Kahoot is free, it’s anonymous, and it’s been used by some Scottish teachers to give quizzes and activities during lockdown.

Use the links below to get the pin number required, and links to download the app on your phone or tablet.

The Muckle Quiz

https://kahoot.it/challenge/08801f97-0ee0-40e1-807b-f00547abbae4_1594558267843

The Wee Quiz

https://kahoot.it/challenge/08801f97-0ee0-40e1-807b-f00547abbae4_1594558408050

If you want to share your scores on social media, make sure to use the hashtag #BlairEverywhere

Contributed by the Cultural Zone

Pompom Eyeballs

   |   By


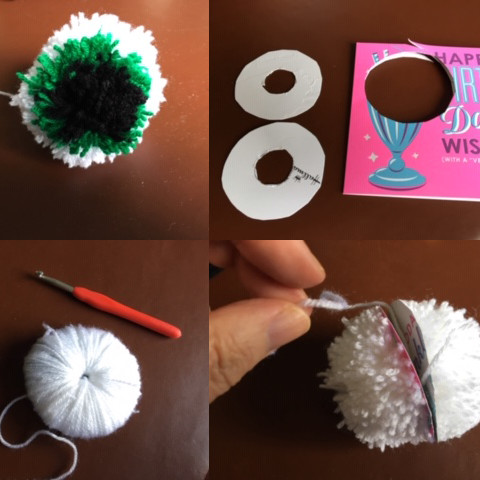
These pompoms can be made in pairs to add to other craft projects, or you could just make a single fluffy eyeball to enjoy as a decoration at home.

You could make a wreath of pompom eyes to hang on your door at Halloween – although it might take you from now until October to finish it!

You will need:

  • Scrap cardboard
  • A small amount of black wool for the pupil
  • Some green/brown/ blue wool for the iris
  • A ball of white wool for the rest of the eye
  • Sharp scissors

The step by step instructions and pictures are below.

Remember you can share pictures with us online. Post your photo with the hashtag #BlairEverywhere and we’ll reshare some of our favourites


Cut two identical circles out of cardboard as
shown. (About 6-7cm diameter with central circle
no bigger than 2cm)

Placing circles together, wind black wool round the
two discs only covering about 15% of the area
Ensure the black wool is quite thick as this will
make the pupil.

Next, cover the black wool completely with
whatever coloured wool you have chosen. This
time make sure it covers about 25% of the surface.
Again make sure it’s a thick layer.

Now using the white wool, completely cover the
whole surface, including the coloured wool. This
will take a little while – good time to have a chat
while doing it. When the centre circle is amost
filled then stop. I used a crochet hook to help get
the wool through, but you could use a pencil.

Slip the scissors in between the two cardboard
discs and cut round the edge. Don’t take the
cardboard off yet!

Cut a length of wool and tie it tightly round the
middle – between the two cardboard discs. (Use a
longer piece of wool if you want to hang it up, but
make sure you don’t leave the ends coming out of
the coloured part.

Now break the cardboard discs off and trim any
loose strands.

We’d love to see photos and videos of you making your pompom eyes! Come and share them with us on social media using #BlairEverywhere

Contributed by the Craft team

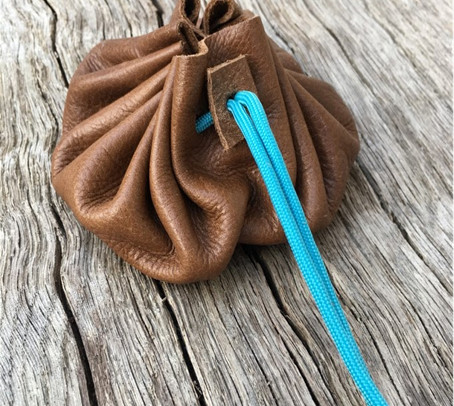
A brown leather pouch with a blue paracord tie holding it closed

Make a leather pouch

   |   By


So, we’re going to make a bush craft pouch which can be used for fire lighting materials or coins or anything you want. If you don’t have all the materials you can improvise and the skills you learn will be easily replicated when you have gathered better materials.

Materials

  • I used leather from an old settee, but you could use canvas from an old tent or any material. Please don’t cut a hole in the family settee!!! Material will tend to fray at the cut edge that’s why leather is better. You can often get nice leather from a furniture store if you ask for some old samples.
  • A piece of paracord, string or twine for closing it.
  • A sharp pair of scissors or a craft knife.
  • Hole punch
  • Pen

We are looking for a piece of leather/material/canvas about 25cm diameter or about the size of a dinner plate. The bigger the piece of material/size of circle then the more you can store in the pouch.

Place on a flat surface and draw around the plate or use a pair of compasses to draw a circle. Watch the point doesn’t puncture the leather.

We need to make holes around the outside edge about 1cm in so it’s better to mark them out first.

We need an even number of holes. 16 will work fine but 32 gives a better finish.
Start drawing a line from top to bottom through the centre like marking out north to south. Then east to west. Keep following the compass points and you’ll have 16 or 32 evenly spaced holes.

We now need to make the holes on the marks. Either a hole punch or a nail or scissors.

We now need a little scrap of leather with 2 holes punched in it.  This will help keep the pouch closed.  You could make a bead from wood or use a plastic bead or whatever you have. 

So, we’re almost there.   Take a length of twine or string, the stronger the better and thread it in and out of the holes.   You want to end up with both tails on the outside of the pouch.

Take the leather tab with the 2 holes in it and fold in half.  Thread both tails through the tab or bead that you have chosen.

Once you pull the cord the pouch will close up.

Congratulations, you should now have a bush craft pouch.   With a little practice and finding the right materials you will get better at making these.   I hope you have fun and enjoy making them.

Share pictures and videos of you making your pouch on social media using the hashtag #BlairEverywhere

Contributed by the Bush Craft team

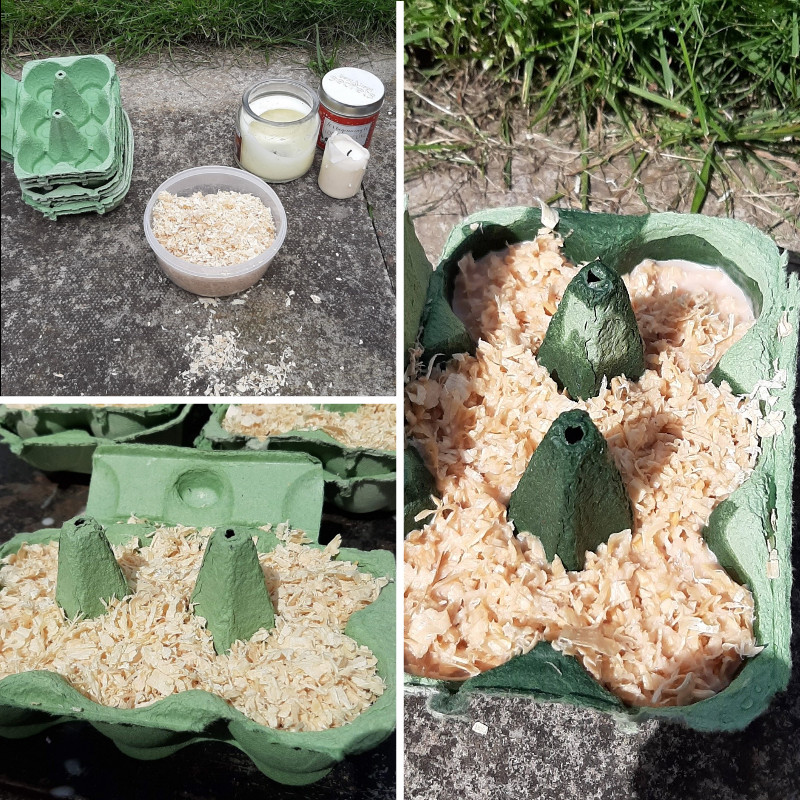
A composite image showing the supplies needed for the egg carton firelighters, and a few steps of the process

Egg Carton Firelighters

   |   By


These firelighters have a number of advantages over the shop bought fire lighters, they don’t have that horrible paraffin smell that gets everywhere, they are cheap, and they last for ages. My explorers have tested them, and one burned for 18 minutes.

You will need:
• a cardboard egg carton
• wood chip/shaving/sawdust (supermarket animal bedding is good)
• candle wax (Old burned out candles are fine or cheap shop-bought candles do just as well)

1 Melt the Wax. SLOWLY
• Be careful, hot wax is like chip fat, it burns very easily and can give you a very nasty burn. Turn off the heat before the wax has fully melted and do not let it boil.
• If the wax starts to pop like chip fat, turn off the heat and wait a few minutes
• Use an old pot or be prepared to do a LOT of clean up
2 Pack sawdust into the egg carton and lightly press it down.
• Fill the cells but do not overfill to the top of the carton.
• It is a good idea to put the carton in a dish in case of leakage.

3 Pour the wax into the cells
• Pour it in until the sawdust is just covered.
• The wax may leak out of the cardboard so please do this on a tray to prevent spillages.
• Top up if necessary
• If the wax is too hot it will leak out through the cardboard.

4 Let it cool completely
• Leave it overnight for the best results

5 Tear off a cell and light the cardboard. It should light instantly and burn for about 10 minutes

6 If you have wax left over, cut the carton lids into strips about 2cm wide and soak in the wax. You can use these for tapers for lighting fires, so much easier to handle than a match.

Now come and share your pictures with us on social media using the hashtag #BlairEverywhere

Contributed by the Bush Craft team

Make your own Balloon Juggling Balls

   |   By


This creates a nice completely smooth ball using 3 balloons (12” size) filled with 3/4 cup (or adjust for the size you like) with short grain rice.

You’ll need:

  • A measuring cup
  • A bottle (I like the Snapple size bottle because of the wider mouth it’s easier to fill with rice)
  • 12” balloons (4 times as many balloons as you want balls)
  • Short grain rice (3/4 cup for each ball you plan to make, plus a little extra cause it’s easy to spill)

Sit outside, or in an area where it’s okay to spill some rice.

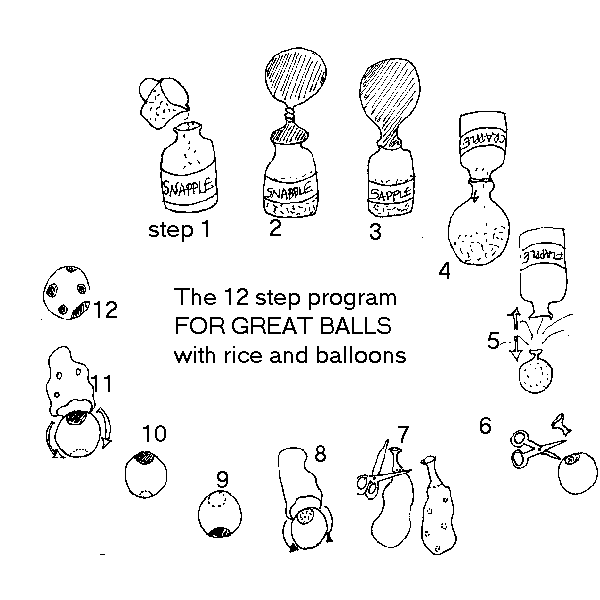
  1. Pour the rice from the measuring cup into the bottle.
  2. Inflate the balloon with just a couple of breaths (so it’s bigger than a juggling ball). and twist (don’t tie) the neck of the balloon, and stretch the mouth of the balloon over the opening of the bottle.
  3. Let the balloon neck untwist (You now have a partially inflated balloon on the neck of a bottle of rice.)
  4. Invert the bottle with the balloon and pour the rice into the balloon.
  5. Take the balloon off the bottle, and let it deflate around the rice inside.
  6. Cut off the entire neck of the balloon, leaving a small hole with rice exposed.
  7. Take a 2nd and 3rd balloon and cut off the necks – plus a little bit more, so the hole is bigger than the neck
  8. [Option: cut tiny holes in 3nd balloon…This makes for very colourful balls, you can even cut tiny fancy patterns of holes if you’re patient. This does make the final stretching in step 11 more difficult, but every hole will leave a polka-dots of the underneath colour showing through once it’s stretched over] (illustration step 7)
  9. Stretch the second balloon wide open (it will sometimes break while trying to do this) and, covering the small exposed hole, enclose the rice-balloon with the 2nd balloon. (steps 8 and 9 in illustration)
  10. Turn the ball over
  11. Repeat with a third balloon and stretch over the ball, covering the place where the ball is just one-balloon thick.
  12. Tada, now learn how to juggle and remember it takes a lot of patience!

Share your juggling balls and skills with us on social media using #BlairEverywhere

Contributed by the Circus Skills team

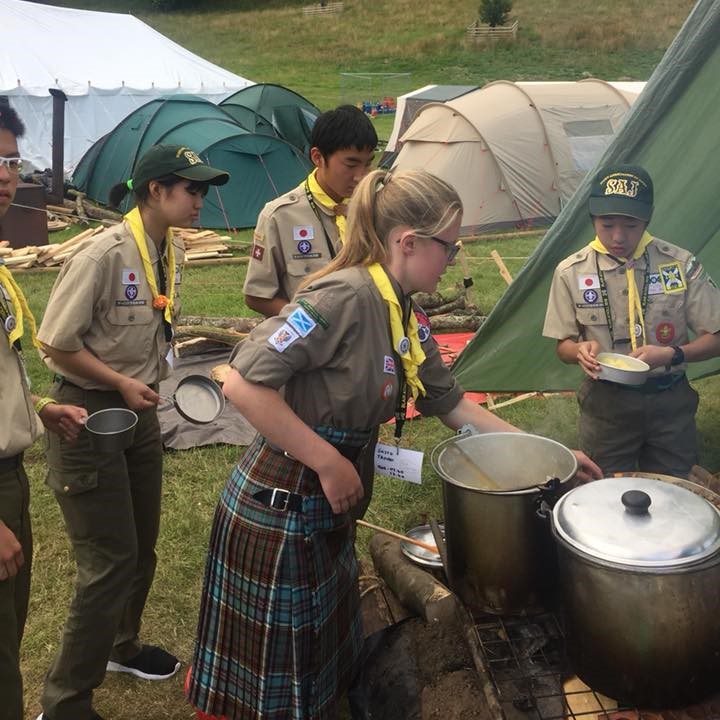
Scottish and Japanese Explorer Scouts cooking dinner at Blair Atholl

Camp menu

   |   By


We had started to plan the menu for Blair Atholl 2020 before the camp was cancelled, so here’s a few days of suggestions that you could make at home.

We’ve posted the list of ingredients for all our dinner recipes, if you want to shop in advance. Make sure you check back from 24-26 July to see all the instructions.

Why not pick one or two days to recreate as part of your Blair Everywhere experience? If you can cook over a fire or a barbecue that would add to the fun, but make sure you get permission and do it somewhere safe! Share your photos on social media with #BlairEverywhere.

Day 1:

Breakfast: fruit juice, cereal, yoghurts, bread, croissants, jam
Lunch: Cold buffet
Dinner: Orzo Pasta with veg & pancetta
Dinner Alternative: Orzo pasta with veg
Dessert: Swiss roll & Custard
Supper: Cake

Day 2:

Breakfast: fruit juice, cereal, veg sausage/ sausage, potato scone, rolls
Lunch: Cold buffet
Dinner: Mince & Potatoes
Dinner Alternative: Quorn Mince & potatoes
Dessert: Angel delight and fruit
Supper: Biscuits & Cheese

Day 3:

Breakfast: fruit juice, cereal, yoghurts, bread, pancakes, butter, jam
Lunch: Cold buffet
Dinner: Chicken Curry
Dinner Alternative: Veg Curry
Dessert: Apple Pie & Cream
Supper: Hotdogs

Day 4:

Breakfast: fruit juice, cereal, Bacon, egg rolls
Lunch: Cold buffet
Dinner: Pork stir fry & noodles
Dinner Alternative: Veg stir fry & noodles
Dessert: Chocolate bananas
Supper: Shortbread & Biscuits

Day 5:

Breakfast: fruit juice, cereal, yoghurts, bread, bagel, cream cheese
Lunch: Cold buffet
Dinner: Smoked sausage pasta in tomato sauce
Dinner Alternative: Pasto with pesto
Dessert: Rice pudding & Fruit
Supper: Cake

Day 6:

Breakfast: fruit juice, cereal, Potato scone, sausage/ vegetarian sausage, egg, rolls
Lunch: Cold buffet
Dinner: Chilli & Rice
Dinner Alternative: 3 bean chilli & rice
Dessert: pot trifles
Supper: Biscuits & Cheese

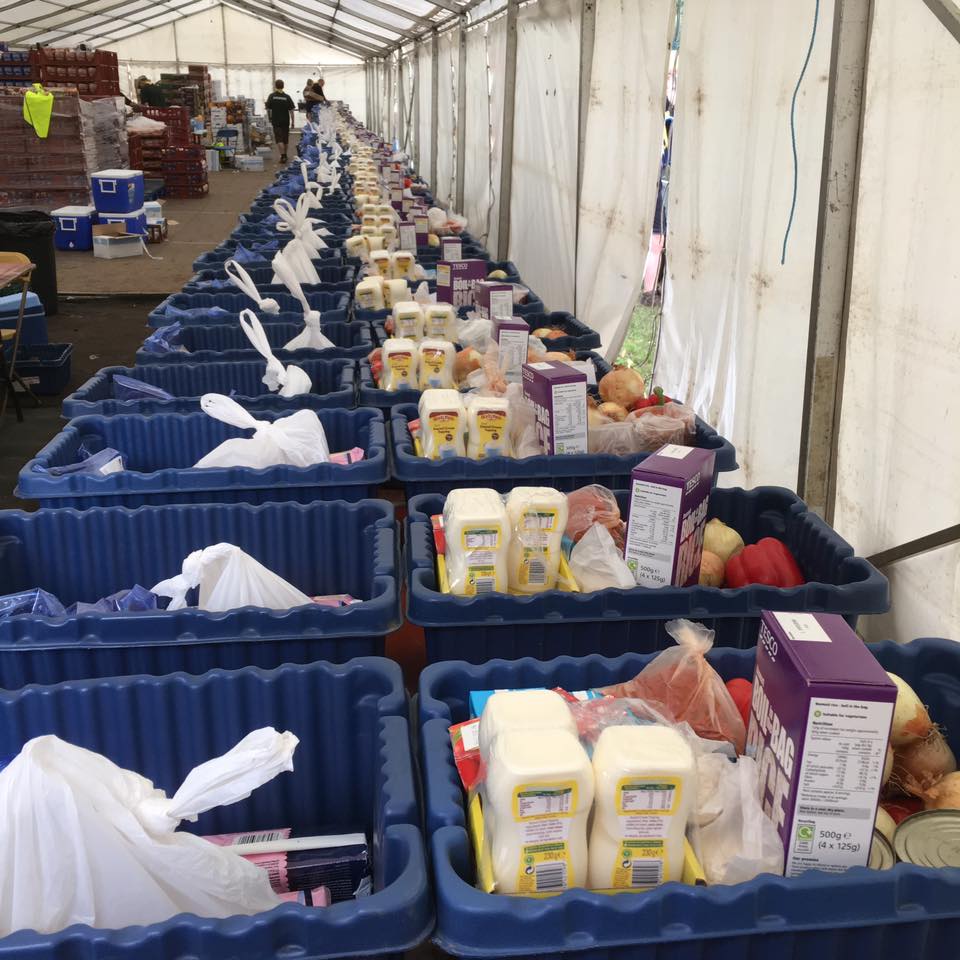
Rows of boxes filled with supplies for the Explorers at Blair Atholl Jamborette

Menu notes

   |   By


About the meals

(This page makes a lot more sense once you’ve read our Camp Menu!)

Breakfast would normally alternate between hot and cold meals. That would mean the patrol only have to light a fire in the morning every second day. If you decide to use one of the hot options, if you have the means to do so, then try cooking it over a fire in the morning whether it’s raining or not! Remember the Explorers on camp don’t get the option!

Lunch is provided centrally from the subcamp. This is due to the Explorers not always having the time or inclination to actually prepare food at lunchtime. This method ensures everyone gets the opportunity to eat.

This year it was going to be a choice of bread, wraps, pitta, salad stuffs, cold meats, tuna mayo, chicken mayo, coleslaw, cheese, dressings, biscuits, crisps and fruit. There would also be the option of soup depending on the weather. Other than the soup this meal is always cold, there is no cooked food at lunchtime.

Dinner – main meal, this is the standard provision for those who have a standard diet and have no other requirements.

This can be tweaked depending on what dietary requirements and allergies we are aware of and is normally done at short notice. As there can be so many variations on specific requirements we tend not to have a written plan in place and make it up as we go along using the various ingredients we’re able to buy.

Dinner – alternative, this is a standard provision for those who are simply vegetarian. We are making progress with this side of the menu in trying to make the vegetarian option suitable for a vegan diet at the same time. Unfortunately with the cancellation this wasn’t completed and the menu you see is pretty much only suitable for vegetarians. Although if you require a vegan option then please substitute as necessary. If you have any suggestions for the future feel free to send us some ideas that we can use in 2022 (remember we don’t have ovens on patrol sites.)

Dinner – dessert, exactly what it says on the tin. Fairly straightforward and enough to satisfy the sweetest tooth most of the time. We don’t have fridges and freezers on the patrol site (only at the main QM store) so the dessert menu has to be thought about carefully.

Supper is provided centrally. The Explorers can pick and choose whether they want to take something or not at this time, normally the subcamp would also put on a pot of hot chocolate for those that want it.

What goes into the menu planning?

Cooking experience, fires and equipment

The menu for the camp is designed with the Explorer age range in mind, some who will be excellent cooks and some not so. What is common amongst them all is that few will have much experience cooking over an open fire for between 8 and 12 people at a time. There are no ovens or microwaves on patrol sites, meals are cooked entirely over unregulated fires. From that point of view the meals and ingredients are fairly basic and I’d suggest to get an authentic experience you either cook on a fire, if you have the means or purely on the hob, no oven or microwave!

This year we were aiming to provide the patrols with more raw ingredients and the option to pick up spices and additional supplements from their subcamp base. The thinking being that the more adventurous could add to their evening meals as necessary.

It’s also worth noting that the patrols are provided with a stock of normal household items at the beginning of the camp. Some of these are mentioned in the methods for creating the main meals but not in the ingredient list. Including salt, pepper, butter/ marg and cleaning products!

Recipe cards vs Camp Cook Book

Previously we provided the patrol with a booklet that gave them ideas for alternative breakfast ideas and the basic recipe for the main meal of the day. In 2020 we had already started to develop this into single A4 pages with a list of the ingredients and a recipe idea to fit what they were provided with. From our point of view this should have worked better, as we can adapt that single page on a daily basis if we have supply issues or if we had to tweak some of the alternative menu options depending on particular dietary requirements.

What we left out

We have taken 6 days menu from what had been planned for the camp at the time of cancellation for you to pick and choose what you might like to try. The 4 days that have been removed are mainly the meals that would have been catered centrally within the subcamp setting rather than in individual patrols of between 8 and 12 Explorers and are geared more towards large catering quantities rather than the standard retail products that we provide the patrols.

Wondering about quantities?

All the products we provide are sourced from wholesalers and local businesses and come in standard sizes that you would normally use in the house, we simply scale it up to 12 people. ie 1x500g pack of pasta for 4 – 5 people (75 – 100g per person) would become 3 x 500g packs. That leaves a little extra should anyone be particularly hungry.

You might look at the menu and think, that’s quite a lot of food when you take into account the 3 course dinner each night, maybe even a bit sugary at times. The Explorers are living in a field and mostly taking part in activities that are draining. They are also on the go from around 7.30 am until 11pm and sometimes a bit later. They need the calories!

Note from the Editor: Thanks to our Camp Quartermaster for giving us this behind the scenes insight into how the menu is planned and thought through!

Day 1

Orzo pasta with veg (& pancetta)

   |   By


Ingredients

  • Pancetta (if using)
  • Garlic Granules/powder
  • Sliced Mushrooms
  • Basil
  • Parmesan
  • Orzo Pasta
  • Chopped Onion
  • Sliced Peppers
  • Veg Stock
  • Lemon
  • Frozen peas

For Dessert

  • Swiss Roll
  • Ambrosia Custard

Method

Warm a large pot add a small amount of oil then add the chopped onion, chopped peppers, sliced mushrooms and garlic along with a pinch of salt and fry until soft.

Increase the heat and stir in the orzo. Fry for 2 mins, stirring constantly, then pour in the stock and bring to a simmer. For a full patrol of 12 you might have 1500g pasta, so you’d use 1500ml stock.

Add more stock gradually, stirring constantly, as the orzo absorbs the liquid (similar to cooking a risotto).

After 5 mins, stir in the petit pois and bring the mixture to a simmer. Continue to add the remaining stock, stirring, as the mixture cooks. Simmer until the orzo is cooked through.

Shortly before the main dish is cooked fry the pancetta in a separate frying pan until crisp and golden (skip this step if you would like the vegetarian option.)

Add the lemon juice & basil

Season to taste, then cover and leave to rest for 2 mins.

Serve and add pancetta, if using, and parmesan as required.

Day 2

Mince and potatoes

   |   By


Ingredients

Beef mince/ Quorn Mince
Quartered Potatoes
Sliced Carrots
Chopped Onions
Beef/ veg stock cube

For dessert:

Angel delight
Milk
Tinned fruit

Method

Cut potatoes into smaller chunks.
Put potatoes in a large pan and cover with cold water and put on heat to boil. (you will want to split your potatoes over a couple of pans to cook quicker).
Boil water and make your stock. (beef stock for the beef mince, veg stock for the quorn mince)
Meanwhile add the oil to a heavy based pan (cast iron is great for this wholesome eat), add carrot, onion and garlic. Cook for a few minutes, stirring frequently so it doesn’t take colour. Add the mince and cook off till completely browned, when browned continue frying for a few more mins. At this point add some salt and pepper.
Add stock and leave the pan slightly covered and simmer for 35 -45 mins. after which time you may season to your taste.
Drain the potatoes and roughly mash with a little butter to taste. Serve the mince with hot buttered potatoes, and bread to soak up the delicious gravy.